My partner took one bite of these crispy witch finger breadsticks with roasted garlic marinara and said, “Okay, this is officially the creepiest thing I’ve loved to eat all year.” Honestly, I wasn’t sure if the spooky shape would be too much, but watching that slow grin spread while dipping these oddly shaped breadsticks into the rich, garlicky sauce made me realize something: this recipe isn’t just about Halloween theatrics. It’s about fun, flavor, and the kind of snack that gets people talking (and sneaking seconds when they think no one’s looking).
That night, the smell of roasting garlic filled the kitchen, mingling with the warm scent of baked dough shaped like knobbly fingers. The way the tips crisped up just right, with almond “nails” peeking out, made the whole thing feel like a little edible magic trick. It’s not a sentimental family memory or a passed-down recipe — it’s more like a playful surprise that won over the dinner table in one go.
What stuck with me wasn’t just the look or the smell, but how easy it was to make something both fun and seriously tasty. These aren’t your run-of-the-mill breadsticks; they’ve got personality and a perfect garlic dip to match. I love that this recipe invites you to get a bit creative while delivering that crave-worthy crunch and depth of flavor. It’s the kind of thing you can bring out when you want to impress friends without a fuss or just enjoy a cozy night with a twist of spooky.
Why You’ll Love This Recipe
- Quick & Easy: Comes together in under 45 minutes, making it perfect for last-minute party snacks or a fun family night.
- Simple Ingredients: No need for obscure spices or specialty items—most of these are pantry staples you already have on hand.
- Perfect for Halloween and Beyond: While great for spooky celebrations, these breadsticks are equally delicious any time you want a playful touch to your appetizer spread.
- Crowd-Pleaser: Kids and grown-ups alike are drawn to the crunchy texture and the savory garlic dip—always a hit at gatherings.
- Unbelievably Delicious: The roasted garlic marinara adds a deep, mellow richness that complements the crispy, lightly herbed breadsticks perfectly.
This recipe stands out because those little details matter—the way the dough is scored to look like knuckles, the almond slices pressed in for fingernails, and the slow-roasted garlic that brings a natural sweetness to the marinara. It’s not just a gimmick; it’s a recipe that delivers on flavor and fun.
Honestly, after making these a few times, I realized this recipe isn’t just good—it’s the kind of snack that makes you pause mid-bite and smile. It’s a playful twist on comfort food that feels both familiar and a little mischievous. If you want an appetizer that’s easy to pull off but memorable enough to impress, this is your go-to.
What Ingredients You Will Need
This recipe brings together simple, wholesome ingredients to create a bold, playful flavor and a satisfying crispy texture without any fuss. Most items are pantry staples, with just a few fresh touches to make it special.
- For the Breadsticks:
- All-purpose flour (about 2 ½ cups / 315 g) – the base for a sturdy but tender dough
- Active dry yeast (2 ¼ tsp or one packet) – for that perfect rise
- Warm water (1 cup / 240 ml) – activates the yeast and hydrates the dough
- Olive oil (2 tbsp) – adds richness and helps crisp the crust
- Sugar (1 tsp) – to help the yeast bloom and a touch of sweetness
- Salt (1 tsp) – balances flavor
- Garlic powder (1 tsp) – for an extra hint of garlic in the dough
- Almond slices (about 20) – pressed in as creepy “fingernails”
- For the Roasted Garlic Marinara:
- Whole head of garlic – roasted until soft and caramelized for mellow sweetness
- Crushed tomatoes (1 can, 14 oz / 400 g) – the base of the sauce
- Olive oil (2 tbsp) – for sautéing and flavor
- Onion (small, finely chopped) – adds natural sweetness
- Dried oregano (1 tsp) – classic Italian herb flavor
- Red pepper flakes (¼ tsp, optional) – for a subtle kick
- Salt and freshly ground black pepper – to taste
- Fresh basil leaves (a handful) – stirred in at the end for freshness
For best results, look for fresh garlic bulbs that feel firm and heavy, and if you can, grab high-quality crushed tomatoes like San Marzano for a naturally sweet, rich sauce. If you want to switch things up, almond slices can be swapped for pecan halves or sunflower seeds if there are nut allergies.
Equipment Needed
- Mixing bowls – one large for the dough, one small for the sauce prep
- Baking sheet lined with parchment paper – prevents sticking and helps crisp
- Pastry brush – to glaze the breadsticks with olive oil before baking
- Sharp knife or kitchen scissors – for scoring the dough to create “knuckle” lines
- Food processor or blender (optional) – handy for pureeing the marinara smooth, though chunky is fine too
- Oven mitts – safety first when handling that hot baking sheet
- Small skillet or saucepan – for sautéing onions and simmering the marinara
If you don’t have a pastry brush, a clean spoon works well to drizzle the olive oil. For scoring the dough, I’ve found kitchen scissors give better control than a knife, especially when shaping the fingers. A digital kitchen timer can be helpful to keep track of rise and baking times, but a phone alarm works just fine too.
Preparation Method
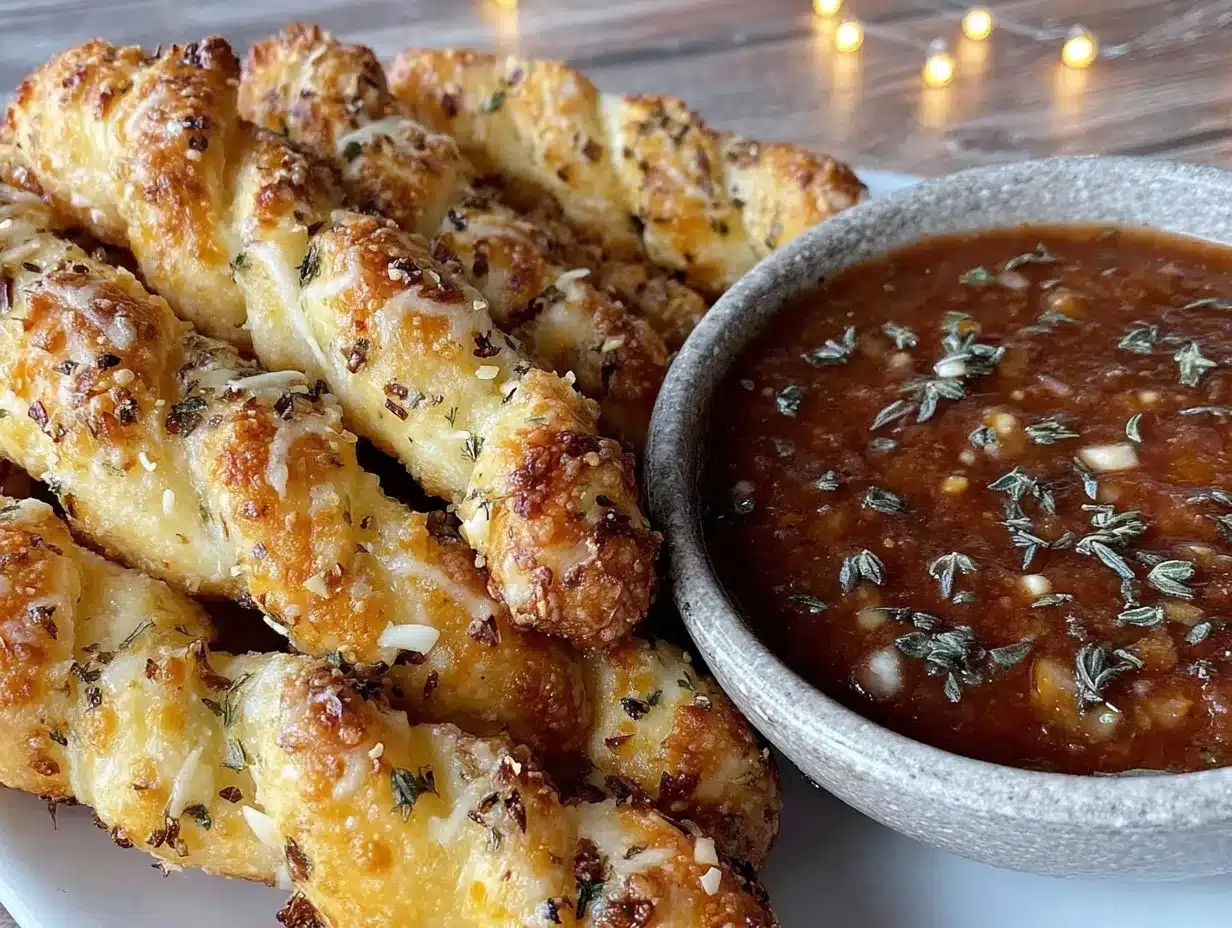
- Activate the yeast: In a small bowl, combine 1 cup (240 ml) of warm water (about 110°F / 43°C) with 1 tsp sugar and the yeast packet (2 ¼ tsp). Stir gently and let it sit for 5-7 minutes until foamy. If it doesn’t foam, your yeast might be inactive, so start again with fresh yeast.
- Make the dough: In a large mixing bowl, whisk together 2 ½ cups (315 g) flour, 1 tsp salt, and 1 tsp garlic powder. Add the olive oil (2 tbsp) and the activated yeast mixture. Mix with a wooden spoon or your hands until a shaggy dough forms.
- Knead: Turn the dough out onto a lightly floured surface. Knead for about 8-10 minutes until smooth and elastic. If it feels too sticky, sprinkle a little more flour, but don’t overdo it—too much flour means tougher breadsticks.
- First rise: Lightly oil a clean bowl, place the dough inside, and cover with a damp cloth or plastic wrap. Let it rise in a warm spot for 45-60 minutes or until doubled in size.
- Prep the roasted garlic: While dough is rising, preheat your oven to 400°F (200°C). Slice the top off the garlic head to expose cloves, drizzle with olive oil, wrap in foil, and roast for 30-35 minutes until soft and golden. Once cool, squeeze out the roasted garlic cloves and mash them.
- Make the marinara: Heat 2 tbsp olive oil in a saucepan over medium heat. Add finely chopped onion and sauté until translucent (about 5 minutes). Stir in the mashed roasted garlic, 1 tsp oregano, and optional red pepper flakes. Pour in the crushed tomatoes, season with salt and pepper, and simmer uncovered for 20 minutes, stirring occasionally. Stir in fresh basil just before serving.
- Shape the breadsticks: Punch down the dough and turn it out onto a floured surface. Divide into 12 equal pieces (about 2 oz or 56 g each). Roll each piece into a finger shape about 5-6 inches (13-15 cm) long. Use kitchen scissors to make 2-3 small cuts near the “knuckles” to create a realistic finger look.
- Add the fingernails: Press an almond slice at the tip of each breadstick to resemble a nail.
- Second rise: Place the shaped breadsticks on a parchment-lined baking sheet, cover loosely with a kitchen towel, and let rest for 20 minutes.
- Bake: Preheat oven to 375°F (190°C). Brush the breadsticks lightly with olive oil and bake for 18-22 minutes until golden and crispy on the edges.
- Cool & serve: Let the breadsticks cool slightly before serving with the warm roasted garlic marinara for dipping.
Pro tip: Keep an eye on the almond nails—they toast quickly and can burn if left too long. If that happens, just swap them out before serving.
Cooking Tips & Techniques
One thing I learned early on making these crispy witch finger breadsticks is not to rush the dough rising process. Yeast needs its time to build that lovely airy texture. Skipping or shortening this step leads to dense, tough fingers—not what you want when you’re aiming for crunch with a soft interior.
When shaping, don’t be afraid to get creative with the knuckle cuts. Some fingers are a little crooked, others have more pronounced “joints” — it adds to the fun and makes each breadstick unique. I usually use kitchen scissors because they give me more control to make those small cuts without tearing the dough.
Roasting the garlic whole is a game-changer here. It mellows the raw sharpness and adds a caramelized depth to the marinara that just can’t be matched by plain garlic powder or fresh minced garlic. If you want a shortcut, pre-roasted garlic in a jar works, but the flavor isn’t quite the same.
One common mistake is over-baking. These breadsticks crisp up quickly, so it’s better to check a few minutes before the timer goes off. You want golden edges but not burnt almond nails or overly dark crusts.
Multitasking tip: While the bread is rising the second time, simmer your marinara so it’s ready to go as soon as the fingers come out of the oven. That way, everything’s warm and fresh for dipping.
Variations & Adaptations
Feel free to customize this recipe to suit different tastes or dietary needs:
- Gluten-Free: Swap all-purpose flour for a gluten-free blend designed for baking (like Bob’s Red Mill 1-to-1). You might need to add a little xanthan gum if your blend doesn’t include it for better structure.
- Vegan Option: Replace olive oil with a vegan butter or coconut oil, and use a vegan-friendly marinara sauce or make your own without animal products.
- Spicy Twist: Add ½ tsp smoked paprika and a pinch of cayenne to the dough for a subtle heat. For the marinara, increase red pepper flakes to taste.
- Herb Variations: Mix fresh rosemary or thyme into the dough for a fragrant change. These herbs pair beautifully with roasted garlic and add complexity.
- Different “Nails”: Try using pumpkin seeds for a nut-free option or even small pieces of black olives for a spooky touch.
A personal favorite variation I tried was adding a little mozzarella cheese inside each finger before baking for a gooey surprise. It turned out messy but oh-so-delicious and perfect for a casual game night.
Serving & Storage Suggestions
These crispy witch finger breadsticks are best served warm with plenty of roasted garlic marinara for dipping. The sauce should be just simmered and fragrant, not cold, to maximize flavor.
For a fun presentation, serve them on a dark platter with a few fresh basil leaves scattered around to brighten the look. They pair nicely with a crisp salad—something light like a spicy sesame cucumber noodle salad balances the richness perfectly.
Leftovers can be stored in an airtight container in the refrigerator for up to 3 days. To reheat, pop them in a 350°F (175°C) oven for 5-7 minutes to bring back their crispiness. Microwaving tends to make them chewy, which nobody wants.
If you have extra marinara, keep it refrigerated for up to 5 days or freeze in small portions. The flavors actually deepen after a day or two, so if you can hold out, the sauce gets even better.
Nutritional Information & Benefits
Each serving (about 2 breadsticks with marinara) contains roughly 220 calories, 6g fat, 32g carbohydrates, 5g protein, and 3g fiber. The recipe is relatively balanced for a snack, with moderate calories and a satisfying protein-fiber combo from the flour and almonds.
Roasted garlic offers notable health benefits: it’s rich in antioxidants and has natural anti-inflammatory properties. The olive oil and herbs add heart-healthy fats and flavor without extra sodium.
This recipe can be made gluten-free or vegan to fit various dietary needs, making it a versatile choice. Just watch out for nut allergies if you use almond slices, and swap accordingly.
Conclusion
These crispy witch finger breadsticks with roasted garlic marinara are more than just a Halloween novelty—they’re a snack that brings a little cheeky fun and serious flavor to your table. Their crunchy edges, soft interiors, and that perfectly mellow garlic dip make them simply irresistible.
Feel free to customize the fingers and sauce to your liking, whether you want to try a cheesy twist, spice it up, or cater to special diets. I love how this recipe invites creativity while being straightforward enough for any home cook to tackle.
So go ahead, get your hands a little messy shaping those eerie fingers, and enjoy a snack that’s as delicious as it is delightfully weird. If you try this recipe, I’d love to hear how you made it your own!
FAQs
- Can I make the dough ahead of time?
Yes! You can prepare the dough the night before and refrigerate it. Just bring it to room temperature before shaping and baking. - What if I don’t have almond slices for the nails?
Sunflower seeds, pumpkin seeds, or small pieces of olives work great as alternatives. - How do I store leftover breadsticks?
Keep them in an airtight container in the fridge for up to 3 days and reheat in the oven to restore crispiness. - Can I use store-bought marinara?
Absolutely, but roasting fresh garlic and adding it to store-bought sauce really boosts the flavor. - Is this recipe kid-friendly?
Definitely! The fun shape and mild garlic flavor make it a hit with kids, especially during festive occasions.
Pin This Recipe!
Crispy Witch Finger Breadsticks with Roasted Garlic Marinara Dip
These crispy witch finger breadsticks paired with a rich roasted garlic marinara dip are a fun and flavorful snack perfect for Halloween or any gathering. They feature a crunchy texture, playful shape, and a deeply savory garlic sauce.
- Prep Time: 15 minutes
- Cook Time: 35 minutes
- Total Time: 50 minutes
- Yield: 12 breadsticks (about 6 servings) 1x
- Category: Appetizer
- Cuisine: Italian-American
Ingredients
- 2 ½ cups (315 g) all-purpose flour
- 2 ¼ tsp active dry yeast (one packet)
- 1 cup (240 ml) warm water (about 110°F / 43°C)
- 2 tbsp olive oil (plus extra for roasting and brushing)
- 1 tsp sugar
- 1 tsp salt
- 1 tsp garlic powder
- About 20 almond slices (for fingernails)
- 1 whole head of garlic (for roasting)
- 1 can (14 oz / 400 g) crushed tomatoes
- 1 small onion, finely chopped
- 1 tsp dried oregano
- ¼ tsp red pepper flakes (optional)
- Salt and freshly ground black pepper, to taste
- A handful of fresh basil leaves
Instructions
- Activate the yeast: In a small bowl, combine 1 cup (240 ml) warm water (about 110°F / 43°C) with 1 tsp sugar and the yeast packet (2 ¼ tsp). Stir gently and let sit for 5-7 minutes until foamy.
- Make the dough: In a large mixing bowl, whisk together 2 ½ cups (315 g) flour, 1 tsp salt, and 1 tsp garlic powder. Add 2 tbsp olive oil and the activated yeast mixture. Mix until a shaggy dough forms.
- Knead the dough on a lightly floured surface for 8-10 minutes until smooth and elastic. Add flour sparingly if too sticky.
- First rise: Lightly oil a clean bowl, place dough inside, cover with damp cloth or plastic wrap, and let rise in a warm spot for 45-60 minutes until doubled in size.
- Prep roasted garlic: Preheat oven to 400°F (200°C). Slice top off garlic head, drizzle with olive oil, wrap in foil, and roast for 30-35 minutes until soft and golden. Cool and mash cloves.
- Make marinara: Heat 2 tbsp olive oil in a saucepan over medium heat. Sauté chopped onion until translucent (~5 minutes). Stir in mashed roasted garlic, 1 tsp oregano, and optional red pepper flakes. Add crushed tomatoes, season with salt and pepper, and simmer uncovered for 20 minutes. Stir in fresh basil before serving.
- Shape breadsticks: Punch down dough, divide into 12 equal pieces (~2 oz / 56 g each). Roll each into 5-6 inch (13-15 cm) finger shapes. Use kitchen scissors to make 2-3 small cuts near ‘knuckles’ for realistic look.
- Add fingernails: Press an almond slice at the tip of each breadstick.
- Second rise: Place breadsticks on parchment-lined baking sheet, cover loosely, and rest for 20 minutes.
- Bake: Preheat oven to 375°F (190°C). Brush breadsticks lightly with olive oil and bake for 18-22 minutes until golden and crispy.
- Cool slightly and serve warm with roasted garlic marinara dip.
Notes
Watch almond nails closely during baking to prevent burning; swap almonds with pecan halves or sunflower seeds for nut allergies. Do not rush dough rising for best texture. Roasting garlic whole mellows sharpness and adds depth. Reheat breadsticks in oven to maintain crispiness; avoid microwaving.
Nutrition
- Serving Size: About 2 breadsticks
- Calories: 220
- Fat: 6
- Carbohydrates: 32
- Fiber: 3
- Protein: 5
Keywords: witch finger breadsticks, Halloween snacks, garlic marinara dip, crispy breadsticks, party appetizer, roasted garlic sauce


