My neighbor, Carol, wasn’t trying to impress me. I’d stopped by to pick up a package that got delivered to her house by mistake, and the smell hit me before I even got to her front door. It was buttery and sweet, with this warm, almost caramel-like note that made me forget why I was even there. She opened the door with flour on her cheek and said, “Oh, those are just some cookie bars I threw together. The grandkids love them this time of year.” Just some cookie bars. I mean, honestly, the woman had created a batch of the most incredible-looking bars I’d ever seen, studded with those little candy corn pieces that I usually only tolerate, and she was acting like she’d made toast. She handed me my package and a napkin with a warm bar on it, and I stood on her porch eating it, not even caring that I was being a little weird about it. The base was soft and chewy, almost like a sugar cookie but thicker, and the candy corn had melted just slightly into the top, creating these little pockets of sweet, creamy goodness. I asked her for the recipe, and she just shrugged and said, “It’s nothing fancy, just a box mix and some candy.” But I knew better. I knew there was something special about the way she did it—the extra vanilla, the way she pressed the dough just so. I went home and spent the next three days trying to recreate it. I got close, then closer, and then, finally, I nailed it. These bars are my love letter to Carol’s casual genius, and honestly, they’re the coziest thing you’ll make all fall. You know that feeling when you take a bite of something and it instantly makes your shoulders drop? That’s these bars.
Why You’ll Love This Recipe
Let me tell you, I’ve tested this recipe about six times to get it just right, and my family has been very happy taste-testers. These bars are the kind of treat that disappears from the counter before you even get a chance to hide a piece for yourself. They’re everything you want in a fall dessert without any of the fuss.
- Quick & Easy: From start to finish, these come together in about 30 minutes of active time. The oven does the rest of the work.
- Simple Ingredients: You probably have most of this stuff in your pantry right now. No fancy extracts or hard-to-find specialty items.
- Perfect for Fall Gatherings: Whether it’s a Halloween party, a cozy Thanksgiving potluck, or just a Tuesday night that needs a little cheering up, these bars fit right in.
- Crowd-Pleaser: I’ve watched kids and adults alike go back for seconds. The candy corn gets a little melty and chewy, and people who swear they don’t like candy corn suddenly change their tune.
- Unbelievably Delicious: The texture is the real star here—a soft, almost gooey center with slightly crisp edges and those little bursts of candy corn sweetness throughout.
What makes these different from every other cookie bar out there? It’s the technique. I use a little trick of browning the butter just slightly—don’t worry, it’s easy—which gives the bars a nutty, warm depth that plays perfectly with the candy corn. It’s not just another sugar cookie bar. It’s your new favorite fall tradition.
What Ingredients You Will Need
This recipe uses simple, everyday ingredients to deliver a big, cozy flavor. Most of these are pantry staples, which makes it perfect for those moments when you just need to bake something warm and sweet.
- For the Cookie Base:
- 1 cup (226g) unsalted butter, softened (I prefer Kerrygold for the rich flavor, but any good brand works)
- 1 cup (200g) granulated sugar
- 1 large egg, room temperature
- 1 large egg yolk, room temperature (this extra yolk is the secret to a chewier bar)
- 2 teaspoons vanilla extract (use pure, not imitation, if you can)
- 2 and 1/4 cups (280g) all-purpose flour, spooned and leveled
- 1/2 teaspoon baking powder
- 1/4 teaspoon baking soda
- 1/2 teaspoon salt
- For the Mix-In & Topping:
- 1 and 1/2 cups (about 250g) candy corn, divided (I use Brach’s, they hold up best during baking)
- Optional: 1/4 cup (about 40g) white chocolate chips or chopped white chocolate, for drizzling after baking
Ingredient Tips: Make sure your butter is truly softened, not melted. You want it to be cool to the touch but give easily when pressed. If your egg is cold, just place it in a bowl of warm water for 5 minutes to bring it to room temperature. For the candy corn, I’ve found that the classic Brach’s brand holds its shape better than some of the store-brand versions, which can turn into a sticky mess. If you want a slightly less sweet bar, you can reduce the candy corn to 1 cup and add 1/2 cup of chopped pecans for a nice crunch.
Equipment Needed
You don’t need a lot of fancy tools for these bars, which is part of their charm. Here’s what you’ll need:
- 9×13-inch baking pan (metal is best for even browning)
- Parchment paper (for easy lifting—trust me on this)
- Electric hand mixer or stand mixer with paddle attachment
- Large mixing bowl
- Medium mixing bowl
- Measuring cups and spoons
- Rubber spatula
- Cooling rack
If you don’t have a 9×13 pan, you can use a 9×9-inch pan, but you’ll need to increase the baking time by about 5-8 minutes and your bars will be thicker. I’ve done it before in a pinch, and they still turned out great. Just keep an eye on them. Also, a good quality spatula is worth its weight in gold here—you want to get every last bit of that buttery dough into the pan.
Preparation Method
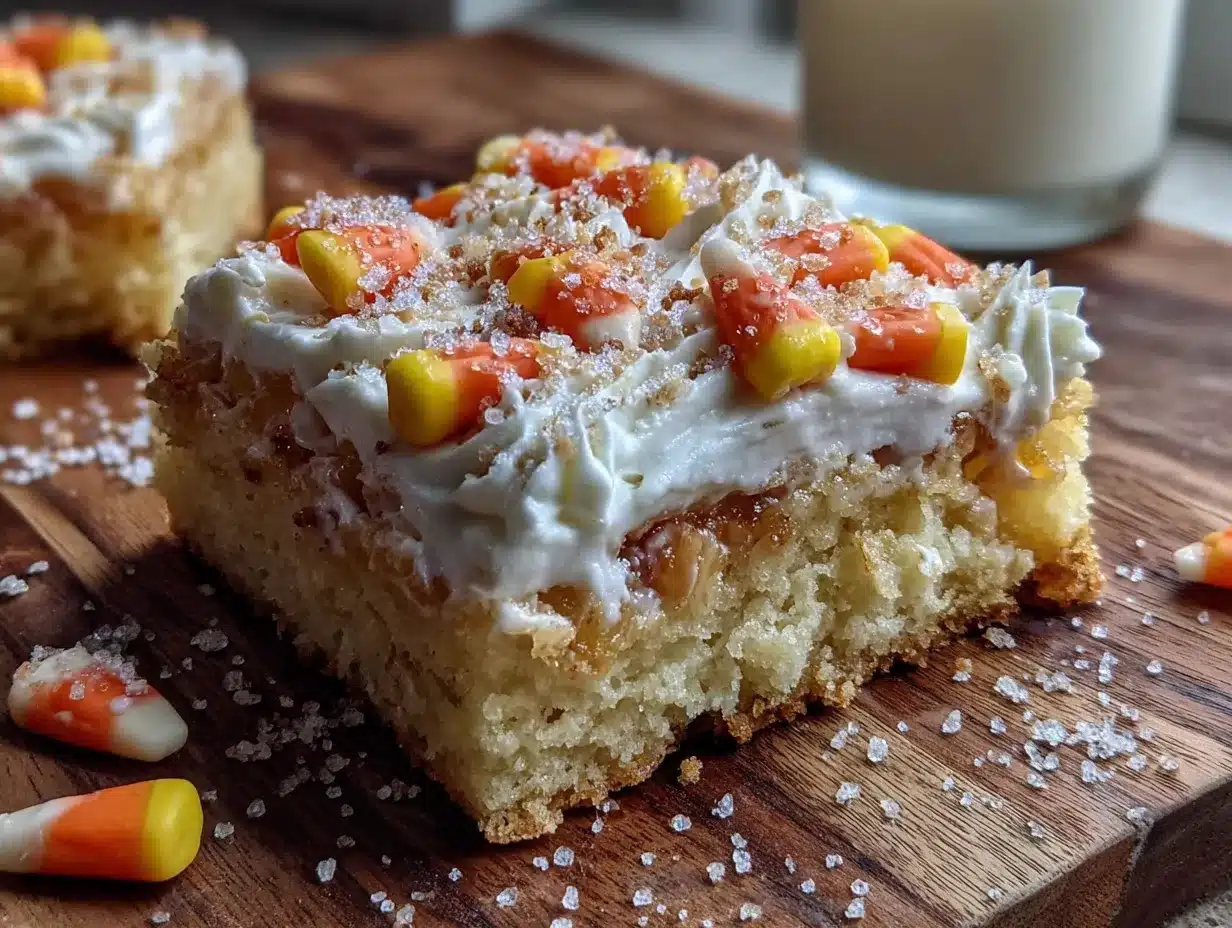
Alright, let’s get to the good stuff. Follow these steps, and you’ll have a pan of the most addictive fall bars you’ve ever made.
- Preheat and Prep: Preheat your oven to 350°F (175°C). Line your 9×13-inch baking pan with parchment paper, leaving a little overhang on the long sides. This will be your handle to lift the bars out later. Lightly grease the parchment with butter or non-stick spray.
- Brown the Butter (Optional but Amazing): In a small saucepan over medium heat, melt 1/2 cup (113g) of the butter. Swirl the pan occasionally. The butter will start to foam, then the milk solids will turn a golden brown and smell nutty. This takes about 4-5 minutes. Pour it into a bowl and let it cool for 10 minutes. If you’re skipping this step (no judgment), just use all softened butter.
- Cream Butter and Sugar: In your large mixing bowl, beat the remaining 1/2 cup (113g) softened butter (and the browned butter if you used it) with the granulated sugar until light and fluffy, about 2-3 minutes. You want it to look pale and airy.
- Add Wet Ingredients: Beat in the egg, then the egg yolk, then the vanilla extract. Mix until just combined. Don’t overmix here—you don’t want to incorporate too much air.
- Mix Dry Ingredients: In a separate medium bowl, whisk together the flour, baking powder, baking soda, and salt. This ensures everything is evenly distributed.
- Combine Wet and Dry: Gradually add the dry ingredients to the wet mixture, mixing on low speed or folding with a spatula until just combined. The dough will be thick and slightly sticky—that’s perfect.
- Fold in Candy Corn: Reserve about 1/2 cup of candy corn for the top. Gently fold the remaining 1 cup of candy corn into the dough. Be careful not to overmix, or the candy corn might start to melt into the dough.
- Press into Pan: Transfer the dough to your prepared pan. Using a spatula or your hands (lightly dampened to prevent sticking), press the dough into an even layer. The dough will be thick, so take your time to get it into the corners.
- Top with Remaining Candy Corn: Sprinkle the reserved 1/2 cup of candy corn evenly over the top, pressing them in gently so they stick.
- Bake: Bake for 18-22 minutes, or until the edges are golden brown and the center is just set. A toothpick inserted into the center should come out with a few moist crumbs, not wet batter. The top will look slightly puffed and pale.
- Cool Completely: Place the pan on a cooling rack and let the bars cool completely in the pan. This is crucial—if you try to cut them while they’re warm, they’ll crumble. I know it’s hard to wait, but it’s worth it. Once cool, use the parchment overhang to lift the entire block out onto a cutting board.
- Slice and Serve: Cut into 24 squares (or 12 bigger ones if you’re feeling generous). If you’re using the white chocolate drizzle, melt the white chocolate chips in a microwave-safe bowl in 20-second intervals, stirring between each, then drizzle over the bars with a fork.
Cooking Tips & Techniques
I’ve made these bars about four times in the last two weeks (my jeans are not happy), and I’ve learned a few things along the way. Let me save you some trouble.
Don’t overbake. This is the number one mistake I made on my first attempt. The bars will look a little underdone in the center when you pull them out, but they continue to set as they cool. Overbaked bars are dry bars, and nobody wants that. Trust the toothpick test—moist crumbs are your friend.
Watch the candy corn. If you fold the candy corn in too aggressively, the colors will bleed into the dough, giving you a strange pinkish-brown tint. It still tastes fine, but it’s not as pretty. Fold gently, like you’re handling a delicate sweater.
Chill the dough if it’s too sticky. If your kitchen is warm and the dough feels like it’s going to glue itself to your hands, pop the bowl in the fridge for 15 minutes before pressing it into the pan. It makes a world of difference.
Use the parchment paper. I know it’s an extra step, but I forgot it once and spent twenty minutes chiseling a corner of a bar out of the pan. Don’t be like me. The parchment overhang is a lifesaver.
Let them cool completely. I said it before, but I’ll say it again. I cut into a warm batch because I couldn’t wait, and I ended up with a pan of delicious crumbs. Patience, my friend.
Variations & Adaptations
These bars are pretty perfect as-is, but if you want to mix things up, here are some ideas I’ve tried and loved.
- Chocolate Lover’s Version: Swap 1/4 cup of the flour for 1/4 cup of unsweetened cocoa powder. The chocolate-candy corn combo is surprisingly good—like a Halloween candy mashup.
- Gluten-Free Option: Use a 1:1 gluten-free baking flour blend (I like Bob’s Red Mill). The texture will be slightly more tender, but they still hold together beautifully.
- Spiced Fall Version: Add 1 teaspoon of cinnamon and 1/4 teaspoon of nutmeg to the dry ingredients. It gives the bars a warm, chai-like flavor that pairs perfectly with the candy corn.
- Vegan Adaptation: Use vegan butter (like Miyoko’s) and a flax egg (1 tablespoon ground flaxseed mixed with 3 tablespoons water, let sit for 5 minutes). The texture will be a little more cake-like, but still delicious.
- Pumpkin Seed Crunch: Sprinkle 1/4 cup of pepitas (pumpkin seeds) over the top along with the reserved candy corn. It adds a nice salty crunch that balances the sweetness.
My personal favorite variation is the spiced version. I made it for a friend’s Halloween party, and people were literally asking for the recipe before they even finished their first bar. The cinnamon just makes everything feel cozier.
Serving & Storage Suggestions
These bars are best served at room temperature, straight from the pan. The texture is perfect—soft, chewy, with just a little give. If you want to get fancy, you can warm them up for about 10 seconds in the microwave, which makes the candy corn get a little gooey again. It’s dangerous, honestly.
For presentation, I like to cut them into neat squares and arrange them on a simple white platter. A light dusting of powdered sugar or a drizzle of white chocolate makes them look extra special for parties. They pair beautifully with a hot cup of apple cider or a spiced chai latte. Honestly, a cold glass of milk is also a perfect companion.
Storage: Store leftover bars in an airtight container at room temperature for up to 4 days. I’ve kept them for 5 days, and they were still good, but they start to get a little dry after that. If you need to keep them longer, you can freeze them.
Freezing Instructions: Wrap the entire block of cooled, uncut bars tightly in plastic wrap, then in a layer of aluminum foil. Freeze for up to 3 months. When you’re ready to enjoy them, thaw overnight in the refrigerator, then bring to room temperature before slicing. You can also freeze individual bars wrapped in plastic for a quick treat.
Reheating: For that fresh-from-the-oven taste, pop a bar in the microwave for 10-15 seconds. It softens the candy corn and makes the base taste almost like it just came out of the oven. The flavors actually develop a bit after a day, so day-old bars are often even better.
Nutritional Information & Benefits
Let’s be real—these are a treat, not a health food. But here’s the estimated breakdown for one bar (based on 24 servings):
| Nutrient | Amount Per Serving |
|---|---|
| Calories | 185 |
| Fat | 9g |
| Saturated Fat | 5g |
| Carbohydrates | 26g |
| Sugar | 16g |
| Protein | 2g |
The butter provides a small amount of vitamin A, and the eggs add a little protein. Honestly, the main benefit here is the joy they bring. Sometimes you need a treat that just makes you happy, and these bars deliver on that front. If you’re watching your sugar intake, you can reduce the candy corn to 1 cup, but it will change the texture slightly.
These bars are not gluten-free by default, but they can easily be adapted (see variations above). They contain dairy, eggs, and gluten. If you have allergies, please check your candy corn label, as some brands may contain traces of other allergens.
Conclusion
These Cozy Candy Corn Sugar Cookie Bars are the kind of recipe that feels like a warm hug on a crisp fall day. They’re simple enough to whip up on a whim but special enough to bring to any gathering. The soft, buttery base, the chewy candy corn pockets, and that slight crispness on the edges—it’s a combination that just works.
I love this recipe because it reminds me that the best things in life are often the simplest. Carol didn’t think she was doing anything special, but she created something that stuck with me. I hope these bars become a little tradition in your home, too. Maybe you’ll make them for a Halloween party, or maybe you’ll make them on a rainy Sunday just because you deserve something sweet.
Now, I want to hear from you! Did you try these bars? Did you add a twist? Let me know in the comments below, and don’t forget to share a photo if you make them. Happy baking, friends!
Frequently Asked Questions
Can I use a different candy instead of candy corn?
Absolutely! You can substitute the candy corn with candy pumpkins, chopped caramel candies, or even butterscotch chips. Just keep in mind that different candies melt at different rates, so you may need to adjust the baking time slightly. I’ve tried it with chopped caramels, and they create these amazing gooey pockets—highly recommended.
Why did my bars turn out dry?
The most common reason is overbaking. Remember, you want to pull them out when the center is just set and a toothpick comes out with moist crumbs. They continue to cook as they cool in the pan. Also, make sure you’re measuring your flour correctly—spoon it into the measuring cup and level it off, don’t scoop directly from the bag, which packs the flour down and adds too much.
Can I make these bars ahead of time?
Yes, and they actually taste better the next day! Bake them, cool them completely, and store them in an airtight container at room temperature. They’ll stay fresh for up to 4 days. You can also freeze the baked, uncut block for up to 3 months.
My candy corn melted too much and made a mess. What did I do wrong?
This usually happens if the oven is too hot or if you folded the candy corn too aggressively into the dough. Make sure your oven is properly calibrated at 350°F, and fold the candy corn in gently at the very end. Also, try using a brand like Brach’s, which tends to hold its shape better during baking.
Can I make these bars gluten-free?
Yes! I’ve had great success using a 1:1 gluten-free baking flour blend. Bob’s Red Mill and King Arthur Flour both make excellent blends. The texture will be slightly more tender and a little less chewy, but they’re still absolutely delicious. Just be sure to check that your candy corn is also gluten-free—most brands are, but it’s always good to verify.
Pin This Recipe!

Cozy Candy Corn Sugar Cookie Bars: Best Fall Treat
These soft and chewy sugar cookie bars are studded with candy corn for a cozy fall treat. They come together quickly with simple ingredients and are perfect for Halloween parties or any autumn gathering.
- Prep Time: 15 minutes
- Cook Time: 20 minutes
- Total Time: 35 minutes
- Yield: 24 servings 1x
- Category: Dessert
- Cuisine: American
Ingredients
- 1 cup (226g) unsalted butter, softened
- 1 cup (200g) granulated sugar
- 1 large egg, room temperature
- 1 large egg yolk, room temperature
- 2 teaspoons vanilla extract
- 2 and 1/4 cups (280g) all-purpose flour, spooned and leveled
- 1/2 teaspoon baking powder
- 1/4 teaspoon baking soda
- 1/2 teaspoon salt
- 1 and 1/2 cups (about 250g) candy corn, divided
- Optional: 1/4 cup (about 40g) white chocolate chips or chopped white chocolate, for drizzling
Instructions
- Preheat your oven to 350°F (175°C). Line a 9×13-inch baking pan with parchment paper, leaving overhang on the long sides. Lightly grease the parchment.
- Optional: In a small saucepan over medium heat, melt 1/2 cup (113g) of the butter. Swirl occasionally until the butter foams and the milk solids turn golden brown and smell nutty (about 4-5 minutes). Pour into a bowl and let cool for 10 minutes. If skipping, use all softened butter.
- In a large mixing bowl, beat the remaining 1/2 cup (113g) softened butter (and the browned butter if used) with the granulated sugar until light and fluffy, about 2-3 minutes.
- Beat in the egg, then the egg yolk, then the vanilla extract. Mix until just combined.
- In a separate medium bowl, whisk together the flour, baking powder, baking soda, and salt.
- Gradually add the dry ingredients to the wet mixture, mixing on low speed or folding with a spatula until just combined. The dough will be thick and slightly sticky.
- Reserve about 1/2 cup of candy corn for the top. Gently fold the remaining 1 cup of candy corn into the dough.
- Transfer the dough to the prepared pan. Using a spatula or lightly dampened hands, press the dough into an even layer.
- Sprinkle the reserved 1/2 cup of candy corn evenly over the top, pressing them in gently.
- Bake for 18-22 minutes, or until the edges are golden brown and the center is just set. A toothpick inserted into the center should come out with a few moist crumbs.
- Place the pan on a cooling rack and let the bars cool completely in the pan.
- Once cool, use the parchment overhang to lift the entire block out onto a cutting board. Cut into 24 squares. If using white chocolate drizzle, melt the white chocolate chips in a microwave-safe bowl in 20-second intervals, stirring between each, then drizzle over the bars.
Notes
Don’t overbake; the bars continue to set as they cool. Fold candy corn gently to prevent color bleeding. If dough is too sticky, chill for 15 minutes before pressing into pan. Let bars cool completely before cutting to avoid crumbling.
Nutrition
- Serving Size: 1 bar
- Calories: 185
- Sugar: 16
- Sodium: 95
- Fat: 9
- Saturated Fat: 5
- Carbohydrates: 26
- Protein: 2
Keywords: candy corn, sugar cookie bars, fall dessert, Halloween treats, easy cookie bars


