I was standing in my community garden plot last October, knee-deep in kale I’d let go to seed, when my neighbor Rose finally broke her silence. She’d been watching me wrestle with a wilting basil plant for weeks, probably wondering why I bothered. “You’re trying too hard,” she said, not unkindly. “Come inside. I’ll show you something that actually works.”
Rose is in her seventies, originally from a small town in Wisconsin, and she has this way of making everything look effortless. Her garden is chaos—tomatoes climbing over marigolds, dill volunteering everywhere—but her kitchen is precise. That afternoon, she pulled out a stick of butter, a bag of chocolate chips, and a heavy-bottomed pan I’d never think to use for cookies. She browned the butter without measuring anything, just watching it like it owed her money. “My grandmother did this during the Depression,” she said, stirring. “Made cheap ingredients taste like a million bucks.”
I took notes on a napkin. The cookies came out of her oven looking unremarkable—flat, a little craggly—but the first bite stopped me mid-conversation. The edges were crisp and caramelized, the centers soft and almost fudgy. That nutty, toasty flavor from the brown butter wrapped around the chocolate like a warm blanket. Honestly, I ate four before I realized I hadn’t offered her one.
I’ve made these cookies at least fifty times since then. I’ve tweaked the flour ratio, tested different chill times, and swapped in fancy chocolate bars. But the version I’m sharing with you today is the one my kids beg for—the one that disappears from the cooling rack before I can hide a single cookie for myself. Maybe you’ve been there, hiding cookies in the freezer behind the frozen peas? Yeah, me too.
This recipe is for real life. It uses ingredients you probably already have, doesn’t require a stand mixer, and somehow manages to please both the “I only eat crispy edges” crowd and the “I want it doughy in the middle” crowd. That’s a small miracle in my house. And it all starts with one simple step that makes everything better: browning the butter.
Why You’ll Love This Recipe
Let me tell you why these cookies have earned a permanent spot in my weekly rotation. I’ve tested this recipe more times than I care to admit—some batches were too flat, some too cakey, some burned on the bottom because I forgot to rotate the pan. But this version? It’s the one that finally worked. Every. Single. Time.
- Quick & Easy: These come together in about 30 minutes of active time (plus a quick chill). Perfect for after-school baking sessions or when a cookie craving hits at 8 PM.
- Simple Ingredients: No weird specialty items. Butter, sugar, eggs, flour, chocolate chips. You probably have everything except maybe the chocolate, and that’s an easy fix.
- Kid-Approved: My kids have deemed these “the best cookies ever made” and they are not easily impressed. The chewy texture and deep caramel flavor win over even the pickiest eaters.
- Budget-Friendly: This recipe uses basic pantry staples and standard chocolate chips. No need for expensive single-origin chocolate or fancy vanilla extract. Trust me, I’ve tried both, and the cheap stuff works fine.
- Crowd-Pleaser: I’ve brought these to potlucks, school events, and holiday parties. They disappear fast. People always ask for the recipe, and I always share it.
What makes these different from every other chocolate chip cookie recipe? It’s the brown butter. That simple extra step transforms ordinary cookies into something truly special. The butter develops a nutty, toasty flavor that you just can’t get any other way. And the technique for achieving that perfect chewy texture—using melted brown butter and a specific ratio of white to brown sugar—creates cookies that stay soft for days. Not that they last that long in my house.
This is comfort food that actually comforts. It’s the kind of cookie that makes you close your eyes after the first bite. The kind that makes your kitchen smell like a bakery. The kind that makes everyone in your family happy, even the ones who claim they “don’t really like sweets.”
What Ingredients You Will Need
This recipe uses simple, everyday ingredients to create something extraordinary. The magic happens through technique, not through fancy shopping trips. Here’s what you’ll need:
For the Cookies
- 1 cup (226g) unsalted butter — This is the star. Browning it brings out a nutty, caramelized flavor that regular melted butter just can’t match. I prefer unsalted so I can control the salt level, but salted butter works if you reduce the added salt slightly.
- 1 cup (200g) packed light brown sugar — Brown sugar adds moisture and that deep, molasses-like flavor that makes these cookies chewy. Dark brown sugar works too and gives an even richer flavor.
- 1/2 cup (100g) granulated sugar — White sugar helps the cookies spread and gives them those crispy edges. The combination of both sugars is key for the perfect texture.
- 2 large eggs, room temperature — Room temperature eggs incorporate more easily into the butter mixture. If you forget to take them out ahead of time, place them in a bowl of warm water for 5 minutes.
- 2 teaspoons vanilla extract — Pure vanilla extract is nice, but honestly, the imitation stuff works fine here. The brown butter is doing most of the flavor work anyway.
- 2 cups (250g) all-purpose flour — Regular all-purpose flour is perfect. I’ve tested this with bread flour and it makes the cookies slightly chewier, but AP flour gives the best balance of chewy and tender.
- 1 teaspoon baking soda — This helps the cookies spread and gives them a nice lift. Make sure it’s fresh—test it by dropping a bit into vinegar; it should fizz.
- 1/2 teaspoon salt — Salt balances the sweetness and enhances the chocolate flavor. I use fine sea salt, but table salt works too. If using salted butter, reduce this to 1/4 teaspoon.
- 2 cups (340g) semi-sweet chocolate chips — I use Nestlé Toll House because that’s what my grocery store carries, but any brand works. For a more “adult” cookie, try chopping up a dark chocolate bar instead. My kids prefer the chips.
Optional Add-Ins
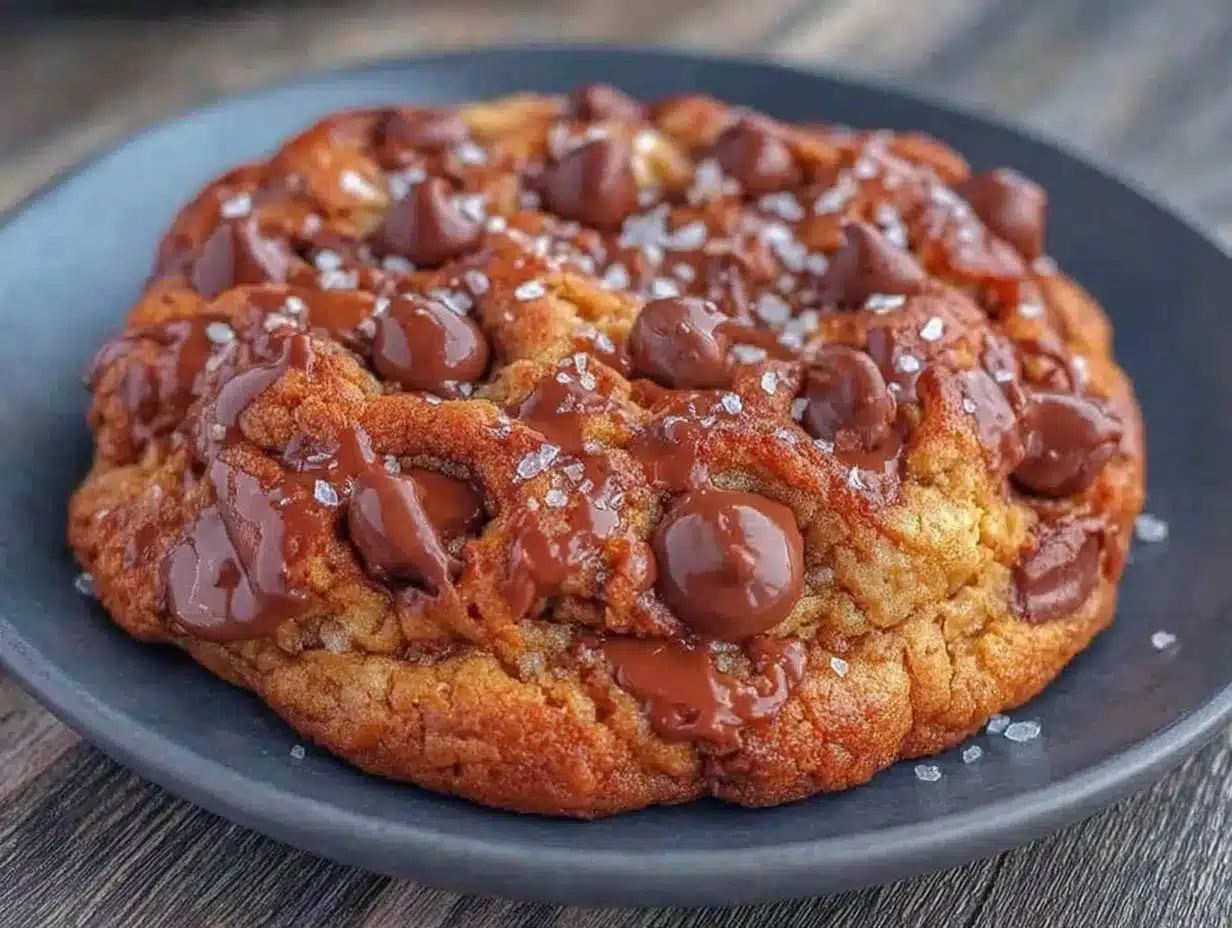
- Flaky sea salt for sprinkling on top — This is not essential, but it takes the cookies to another level. A tiny pinch of Maldon or any flaky salt on each cookie right after baking creates a sweet-salty contrast that’s absolutely addictive.
- 1/2 cup chopped nuts (walnuts or pecans) — My neighbor Rose adds walnuts to hers. I leave them out because my kids complain, but toasted pecans would be amazing.
One thing I’ve learned: the quality of your chocolate matters more than you think. Cheap chocolate chips often contain stabilizers that prevent them from melting properly. If you can, splurge on a bag of Guittard or Ghirardelli chips. But honestly, even the store brand works fine when you’re in a pinch. I’ve used all of them, and the cookies are always delicious.
Equipment Needed
You don’t need a fancy kitchen to make these cookies. Here’s what you’ll actually use:
- Heavy-bottomed saucepan or skillet — This is crucial for browning the butter without burning it. A light-colored pan helps you see the color change. I use a stainless steel saucepan, but a non-stick skillet works too. Avoid thin pans that heat unevenly.
- Large mixing bowl — Any big bowl works. I use a ceramic one because it’s heavy and doesn’t slide around.
- Whisk — For mixing the wet ingredients. A wooden spoon works too, but a whisk incorporates the eggs more smoothly.
- Rubber spatula — For scraping every last bit of brown butter from the pan. Don’t skip this—that’s the good stuff.
- Baking sheets — Two standard half-sheet pans. I prefer light-colored aluminum pans because they distribute heat evenly. Dark pans can cause the bottoms to burn.
- Parchment paper — Non-stick and makes cleanup a breeze. Silicone baking mats work too, but I find parchment gives slightly crisper edges.
- Cookie scoop — A 1.5-tablespoon scoop makes uniform cookies. If you don’t have one, use two spoons. I actually prefer a slightly larger scoop for bakery-style cookies.
- Cooling rack — Essential for letting the cookies cool properly. If you leave them on the hot pan, they’ll continue cooking and might over-brown.
If you don’t have a cookie scoop, don’t worry. I went years without one and just used two spoons. The cookies won’t be perfectly round, but they’ll taste the same. Honestly, the slightly imperfect ones look more homemade anyway.
Preparation Method
Let’s get baking. I’ve broken this down into clear steps with all the little details I’ve learned from making these cookies dozens of times. Read through once before starting, and you’ll be fine.
- Brown the butter. Place the butter in a light-colored saucepan over medium heat. Stir occasionally with a rubber spatula or wooden spoon. The butter will melt, then foam, then start to crackle and pop. Keep stirring. After about 5-7 minutes, you’ll see brown specks forming at the bottom of the pan. The butter will smell nutty and toasty. As soon as it turns a golden-amber color and the specks are a light brown, remove it from the heat immediately. Pour it into a heat-safe bowl, making sure to scrape all those brown bits in. Those bits are pure flavor. Let it cool for 10-15 minutes while you prep the other ingredients. Warning: The butter continues to cook even after you remove it from the heat, so err on the side of taking it off early rather than late. Burnt brown butter tastes bitter and you’ll have to start over.
- Mix the sugars and butter. In a large mixing bowl, combine the cooled brown butter with the brown sugar and granulated sugar. Whisk vigorously for about 1 minute until the mixture looks like wet sand and is well combined. It won’t be fluffy like creamed butter and sugar—that’s okay. The texture should be smooth and slightly grainy.
- Add the eggs and vanilla. Crack the eggs into the bowl, one at a time, whisking well after each addition. Add the vanilla extract. Whisk for another 30-60 seconds until the mixture is smooth, glossy, and slightly thickened. It should look like caramel sauce. If it looks separated or greasy, you might have added the eggs while the butter was still too warm—let the mixture sit for a few minutes and whisk again. It will come together.
- Combine the dry ingredients. In a separate medium bowl, whisk together the flour, baking soda, and salt. Make sure the baking soda is evenly distributed—clumps of baking soda will leave a weird taste in your cookies. Yes, I learned this the hard way.
- Mix wet and dry. Pour the dry ingredients into the wet ingredients. Use a rubber spatula or wooden spoon to fold everything together gently. Stir just until no streaks of flour remain. A few streaks are okay—overmixing will make the cookies tough. The dough will be soft, slightly greasy-looking, and very sticky. That’s normal.
- Fold in the chocolate chips. Add the chocolate chips to the dough. Fold them in with the spatula until evenly distributed. If the dough seems too soft to handle, you can refrigerate it for 15 minutes at this point. But honestly, I usually skip that step and move right to scooping.
- Chill the dough (important!). Cover the bowl with plastic wrap or transfer the dough to an airtight container. Refrigerate for at least 30 minutes, but 1-2 hours is better. This step is not optional—chilling solidifies the butter, prevents the cookies from spreading too much, and develops the flavor. I’ve made these without chilling and they turned into flat, greasy pucks. Trust me on this one. Pro tip: You can chill the dough for up to 72 hours. The longer it chills, the more complex the flavor becomes. I often make the dough the night before and bake fresh cookies the next day.
- Preheat the oven. About 15 minutes before you’re ready to bake, preheat your oven to 350°F (175°C). Line two baking sheets with parchment paper.
- Scoop the cookies. Use a cookie scoop or two spoons to portion the dough into balls about 1.5 tablespoons each (roughly 30g). Place them 2 inches apart on the prepared baking sheets. I usually fit 8-9 cookies per standard half-sheet pan. For bakery-style cookies, make them slightly larger—about 2 tablespoons each—and add a few extra chocolate chips on top of each dough ball. This makes them look prettier and ensures chocolate in every bite.
- Bake. Bake one sheet at a time in the center of the oven. Bake for 10-12 minutes. At 10 minutes, the edges should be golden brown and set, but the centers will still look soft, puffy, and slightly underdone. That’s exactly what you want. The cookies will continue to bake on the hot pan after you remove them. If you prefer crispier cookies, bake for 12-13 minutes. Sensory cue: Your kitchen should smell like toasted butter and vanilla. The edges should look lacy and caramelized, while the centers remain pale.
- Cool on the pan. Remove the baking sheet from the oven and let the cookies cool on the pan for 5-7 minutes. This step is crucial—if you try to move them too soon, they’ll fall apart. After 5-7 minutes, use a spatula to transfer the cookies to a wire rack to cool completely. If you’re adding flaky sea salt, sprinkle it on right when they come out of the oven, while the tops are still soft.
- Repeat. Let the baking sheets cool completely between batches, or use a second set of pans. Placing dough on a hot pan will cause the butter to melt too quickly, resulting in flat cookies. I learned this after ruining an entire batch. Now I keep two pans and rotate them.
Cooking Tips & Techniques
After making these cookies more times than I can count, I’ve collected a few tricks that make a real difference. Some I learned from culinary school, most I learned from burning things and starting over.
The butter temperature matters. When you brown butter, let it cool to just warm—not hot—before adding the sugars. If it’s too hot, it will melt the sugar too quickly and your cookies will spread into thin, greasy discs. If it’s too cold, it won’t incorporate properly. The sweet spot is about 90-100°F, or when the bowl feels warm to the touch but not hot. I usually let it sit for 10-15 minutes while I measure the other ingredients.
Don’t skip the chill. I know it’s tempting to skip this step when you’re craving cookies right now. But the chill time is non-negotiable for chewy, thick cookies. It allows the flour to fully hydrate, the flavors to meld, and the butter to firm up. Without it, your cookies will spread into thin, crispy messes. I’ve tested this multiple times (okay, maybe 10 times) and the chilled dough always wins. If you’re truly in a hurry, 20 minutes in the freezer works in a pinch.
Use a kitchen scale. This is the single best piece of advice I can give you. Measuring flour by volume (cups) is wildly inconsistent—you can end up with anywhere from 120g to 160g of flour per cup depending on how you scoop. Too much flour makes dry, cakey cookies. Too little makes flat, greasy ones. A $15 kitchen scale eliminates this problem. I use 250g of flour for this recipe, and my cookies come out perfect every time.
Rotate your pans. Halfway through baking, rotate the baking sheet 180 degrees. Most ovens have hot spots, and this ensures even browning. I’ve forgotten to do this and ended up with half a batch of burned cookies. Not my finest moment.
Let them cool properly. The 5-7 minute rest on the baking sheet is not optional. During this time, the cookies continue to set and develop that perfect chewy texture. If you move them too soon, they’ll fall apart. If you leave them too long, they’ll overcook on the hot pan. Set a timer—your future self will thank you.
Multitask wisely. While the butter is browning, measure your dry ingredients. While the dough is chilling, wash the dishes. While one batch is baking, scoop the next batch onto parchment paper. This keeps the process moving and prevents that frantic “oh no, the cookies are burning and I haven’t scooped the next batch” panic. Not that I’ve ever done that. More than once.
Variations & Adaptations
This recipe is wonderfully flexible. Here are some variations I’ve tried and loved:
Gluten-Free Version: Substitute the all-purpose flour with a 1:1 gluten-free baking flour blend that contains xanthan gum. I’ve used King Arthur Measure for Measure and Cup4Cup with great results. The texture is slightly more tender, but the flavor is identical. Let the dough chill for at least 1 hour—gluten-free flours need more time to hydrate.
Double Chocolate Chip: Replace 1/4 cup (30g) of the flour with 1/4 cup (20g) of unsweetened cocoa powder. Use white chocolate chips instead of semi-sweet for a dramatic black-and-white look. My kids went crazy for these. They look fancy but are just as easy to make.
Brown Butter Oatmeal Chocolate Chip: Reduce the flour to 1 3/4 cups (220g) and add 1 cup (90g) of old-fashioned rolled oats. The oats add chewiness and a hearty texture. Toast the oats in the oven at 350°F for 5-7 minutes before adding them to the dough for extra flavor. This version is my husband’s favorite—he says it feels “healthier” even though it’s not really.
Milk Chocolate and Toffee: Swap the semi-sweet chips for milk chocolate chips and add 1/2 cup (85g) of chopped toffee bits (like Heath bar). The toffee gets crispy in the oven and adds a buttery crunch. This is a dangerous combination—I can’t stop eating them.
Vegan Adaptation: Use vegan butter (I like Miyoko’s or Earth Balance) and a flax egg (1 tablespoon ground flaxseed mixed with 3 tablespoons water, let sit for 5 minutes). The texture is slightly less chewy but still delicious. Chill the dough for at least 1 hour. I’ve made these for a friend’s vegan birthday party and they were a hit.
Low-Sugar Option: Reduce the granulated sugar to 1/4 cup (50g) and use a sugar substitute like Swerve or monk fruit sweetener for the remaining 1/4 cup. The cookies will be slightly less crisp on the edges, but the brown butter flavor still shines through. This is my go-to when I’m trying to be “good” but still want a cookie.
Spiced Brown Butter Cookies: Add 1 teaspoon of cinnamon, 1/2 teaspoon of nutmeg, and 1/4 teaspoon of cardamom to the dry ingredients. These are incredible during the holidays. The warm spices complement the nutty brown butter beautifully. I made these for a Christmas cookie exchange and got three recipe requests.
Serving & Storage Suggestions
These cookies are best served warm, when the chocolate is still slightly melty and the edges are crisp. But let’s be real—they’re also fantastic at room temperature, straight from the fridge, or even frozen (don’t judge me).
Serving Temperature: If you’re serving these to guests, warm them in a 300°F oven for 3-5 minutes before serving. This revives the crispy edges and soft centers. Microwaving works in a pinch (10-15 seconds per cookie) but can make them slightly soggy.
Presentation Ideas: Stack them on a rustic wooden board or a simple white plate. Sprinkle a little flaky sea salt on top for visual appeal. Serve with a glass of cold milk for kids, or with a cup of strong coffee for adults. For a dessert platter, arrange them alongside fresh berries and a dollop of whipped cream. They also make fantastic ice cream sandwiches—just sandwich a scoop of vanilla ice cream between two cookies and roll the edges in mini chocolate chips.
Storage: Store cooled cookies in an airtight container at room temperature for up to 5 days. Layer them with parchment paper between each layer to prevent sticking. Do not store them in the refrigerator—the cold air dries them out and makes them stale faster. Trust me, I’ve tried it.
Freezing: These cookies freeze beautifully. You have two options: freeze the baked cookies or freeze the raw dough. For baked cookies, let them cool completely, then place them in a single layer in a freezer-safe bag or container. They’ll keep for up to 3 months. Thaw at room temperature for 15-20 minutes, or warm in the oven. For raw dough, scoop the dough balls onto a parchment-lined baking sheet and freeze until solid (about 1 hour). Transfer the frozen dough balls to a freezer bag. Bake from frozen, adding 2-3 minutes to the baking time. This is my favorite method—I always have a bag of cookie dough in the freezer for emergencies.
Flavor Development: Here’s a secret: these cookies actually taste better the next day. The flavors continue to meld and deepen as they sit. The brown butter flavor becomes more pronounced, and the texture evens out. So if you can resist eating them all on day one, you’re in for a treat on day two. I’ve never managed to test this theory past day three because they’re always gone by then.
Nutritional Information & Benefits
Let’s be honest—cookies are not health food. But knowing what’s in them helps you make informed choices. Here’s the approximate nutritional breakdown for one cookie (based on 36 cookies per batch):
| Nutrient | Amount Per Cookie |
|---|---|
| Calories | 145 |
| Total Fat | 8g |
| Saturated Fat | 5g |
| Cholesterol | 25mg |
| Sodium | 95mg |
| Total Carbohydrates | 18g |
| Dietary Fiber | 1g |
| Sugars | 12g |
| Protein | 2g |
These numbers are estimates and will vary based on your specific ingredients and portion sizes. If you use dark chocolate chips (70% cacao or higher), you’ll get a small boost of antioxidants and less sugar. The brown butter adds a touch of vitamin A and healthy fats, but let’s not pretend we’re eating these for the nutritional value.
Dietary Considerations: This recipe contains gluten, dairy, and eggs. For gluten-free and vegan options, see the variations section above. The recipe is nut-free as written, but check your chocolate chips for cross-contamination warnings if you have a severe allergy. The cookies are also relatively low in fiber, so pair them with a piece of fruit or a handful of nuts for a more balanced snack.
I personally believe that food should be enjoyed without guilt. These cookies are a treat, and treats are part of a balanced life. I make them for birthdays, bad days, good days, and random Tuesdays. They bring joy to my family, and that’s worth every calorie.
Conclusion
These brown butter chocolate chip cookies have become a staple in my kitchen for good reason. They’re simple enough for a beginner baker, reliable enough for a busy parent, and impressive enough for any occasion. The nutty, caramelized flavor of the brown butter transforms ordinary ingredients into something truly special—without requiring any fancy techniques or expensive equipment.
I love that this recipe brings people together. My kids fight over who gets to lick the spatula. My husband hides a few in his workshop “for later.” My neighbor Rose, who first showed me how to brown butter, gets a plate every time I bake a batch. It’s more than a cookie—it’s a small act of connection, made possible by a simple pan and a little patience.
I encourage you to make this recipe your own. Add nuts if your family likes them. Swap in dark chocolate if you prefer less sweetness. Double the batch and freeze half for emergencies. The beauty of this recipe is its flexibility—it works with whatever you have on hand and whatever your family loves.
When you make these cookies, I’d love to hear how they turn out. Did your kids approve? Did you try a variation? Did you manage to save any for the next day? Drop a comment below and share your experience. And if you have a favorite cookie memory, I’d love to hear that too. Happy baking, friends—you’ve got this.
Frequently Asked Questions
Can I use salted butter instead of unsalted?
Yes, you can. Just reduce the added salt in the recipe to 1/4 teaspoon. The brown butter flavor will still come through beautifully. I’ve made this swap many times when I only had salted butter in the fridge.
Why did my cookies turn out flat?
The most common reasons are: the butter was too warm when you mixed it, you didn’t chill the dough long enough, or you used too little flour. Make sure your brown butter has cooled to room temperature, chill the dough for at least 30 minutes, and measure your flour correctly (spoon it into the cup, don’t scoop directly).
Can I freeze the cookie dough?
Absolutely! Scoop the dough into balls, freeze them on a baking sheet until solid, then transfer to a freezer bag. Bake from frozen, adding 2-3 minutes to the baking time. This is my favorite meal prep hack—fresh cookies whenever you want them.
How do I get perfectly round cookies?
Right after the cookies come out of the oven, use a round cookie cutter or a large glass that’s slightly larger than the cookies. Place it over each cookie and gently swirl it in a circular motion. This pushes the edges inward and creates perfectly round cookies. I learned this trick from a bakery owner and it works like magic.
Can I make these cookies without a mixer?
Yes! This recipe is designed to be made by hand. A whisk and a rubber spatula are all you need. The dough is soft enough to mix easily without a stand mixer or hand mixer. In fact, I prefer making them by hand—it’s less cleanup and I feel more connected to the process.
Pin This Recipe!

Best Chewy Brown Butter Chocolate Chip Cookies: Easy Homemade
These brown butter chocolate chip cookies are chewy, nutty, and perfectly balanced with crisp edges and soft centers. Made with simple ingredients and no mixer required, they’re a crowd-pleasing treat that stays soft for days.
- Prep Time: 30 minutes
- Cook Time: 12 minutes
- Total Time: 1 hour 42 minutes (includes 1 hour chill time)
- Yield: 36 cookies 1x
- Category: Dessert
- Cuisine: American
Ingredients
- 1 cup (226g) unsalted butter
- 1 cup (200g) packed light brown sugar
- 1/2 cup (100g) granulated sugar
- 2 large eggs, room temperature
- 2 teaspoons vanilla extract
- 2 cups (250g) all-purpose flour
- 1 teaspoon baking soda
- 1/2 teaspoon salt
- 2 cups (340g) semi-sweet chocolate chips
- Flaky sea salt for sprinkling (optional)
- 1/2 cup chopped nuts (walnuts or pecans, optional)
Instructions
- Brown the butter: Place butter in a light-colored saucepan over medium heat. Stir occasionally until melted, foamy, and then crackling. After 5-7 minutes, brown specks appear and the butter smells nutty. Remove from heat immediately and pour into a heat-safe bowl, scraping all brown bits. Cool for 10-15 minutes.
- Mix sugars and butter: In a large bowl, combine cooled brown butter with brown sugar and granulated sugar. Whisk vigorously for about 1 minute until mixture looks like wet sand and is well combined.
- Add eggs and vanilla: Add eggs one at a time, whisking well after each. Add vanilla and whisk for 30-60 seconds until smooth, glossy, and slightly thickened.
- Combine dry ingredients: In a separate bowl, whisk together flour, baking soda, and salt.
- Mix wet and dry: Pour dry ingredients into wet. Fold gently with a rubber spatula until just combined (a few streaks of flour are okay).
- Fold in chocolate chips: Add chocolate chips and fold until evenly distributed.
- Chill dough: Cover bowl and refrigerate for at least 30 minutes (1-2 hours is better, up to 72 hours for deeper flavor).
- Preheat oven: Preheat to 350°F (175°C). Line baking sheets with parchment paper.
- Scoop cookies: Use a 1.5-tablespoon cookie scoop to portion dough into balls (about 30g each). Place 2 inches apart on prepared sheets. Optionally press extra chips on top.
- Bake: Bake one sheet at a time in the center of the oven for 10-12 minutes. Edges should be golden and set, centers soft and puffy. For crispier cookies, bake 12-13 minutes.
- Cool on pan: Let cookies cool on the baking sheet for 5-7 minutes. If using flaky salt, sprinkle on right after removing from oven.
- Transfer and repeat: Transfer cookies to a wire rack to cool completely. Let baking sheets cool between batches.
Notes
Chilling the dough is essential for thick, chewy cookies. Brown butter continues to cook after removing from heat, so remove it when it’s a light amber color. For best results, use a kitchen scale to measure flour. Cookies can be stored in an airtight container at room temperature for up to 5 days, or frozen for up to 3 months.
Nutrition
- Serving Size: 1 cookie
- Calories: 145
- Sugar: 12
- Sodium: 95
- Fat: 8
- Saturated Fat: 5
- Carbohydrates: 18
- Fiber: 1
- Protein: 2
Keywords: brown butter chocolate chip cookies, chewy chocolate chip cookies, easy cookie recipe, homemade cookies, best chocolate chip cookies


